If you’re supporting iOS 13 minimally, you should give Asset Catalog and the system dark mode another look. It was in iOS 13 (back in 2019!) that Apple added dark mode support. The time is ripe.
If you’ve been supporting dark mode prior to iOS 13 using your custom method, you might want to migrate to the newer Asset Catalog and make use of the system dark mode support.
Why use Asset Catalog?
Asset Catalog has been around much longer. It is the way for specifying colors and images in one place.
What makes it outstanding is that you can specify for different traits and platforms. Let’s use this example where I added this awesome color to represent for both light (any as a default) and dark mode.
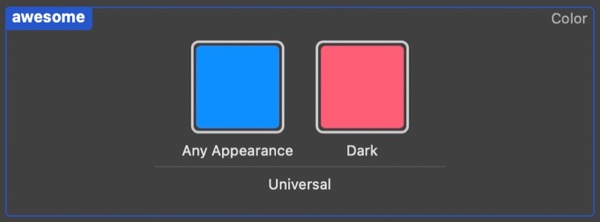
That’s not all. I can also specify a different color for different devices (Mac, Watch), different Gamut (sRGB, P3), and can even localize it!

So if you’re not using asset catalog yet, consider again.
It’s time to ditch that custom Color class.
How to use it in code?
// For UIKit
view.background = UIColor(named: "awesome")!

// For SwiftUI
view.background(Color("awesome"))
It is that simple to use, while the system will take care of the rest.
You can also press CMD + SHIFT + L to bring up the library and search there nicely.
At times, you might want the individual colors. This is a handy extension.
extension UIColor {
    var light: UIColor {
        resolvedColor(with: .init(userInterfaceStyle: .light))
    }

    var dark: UIColor {
        resolvedColor(with: .init(userInterfaceStyle: .dark))
    }
}
At times, you might even want to define your dark mode images at runtime, using imageAsset. There is no equivalent for colors.
How to override light/dark mode in app?
By default, apps will use the system wide mode as selected by the user.
But apps can also allow users to select a different mode for the app. Eg. system wide selected light mode, but app wants to use dark mode.
This is made possible by using overrideUserInterfaceStyle, a UIView property.
We can simply set for the window, and the rest of the views in it will be updated. Viola!
appDelegate.window.overrideUserInterfaceStyle = isDarkModeForApp ? .dark : .light
The system will redraw itself. In some cases, you might need to write your appearance-sensitive changes in these lifecycle methods. One such case is when using CALayer.
override func viewDidLayoutSubviews() {
    super.viewDidLayoutSubviews()

    // CALayer configurations must be set in `viewDidLayoutSubviews()`, or other lifecycle drawing methods
    view.layer.backgroundColor = UIColor.systemBackground.cgColor
}
For SwiftUI app, we can set the colorScheme environment.
struct ContentView: View {
    @State private var isDarkMode = true
    var body: some View {
        VStack {
            Toggle("Change colorScheme", isOn: $isDarkMode)
        }
        .environment(\.colorScheme, isDarkMode ? .dark : .light)
    }
}
Another way is to set UIUserInterfaceStyle in Info.plist to apply a color scheme to the whole app. This is usually used if you need to opt out of system light/dark mode (and use your app custom mode).