Core Data has been around for 10 years, with many legacy concepts and APIs. This guide is the modern way to use Core Data, until further WWDC updates :)
If you are interested in the history of how we got here, the last section has the long history, describing the 3rd party stacks and libraries, and issues.
The technology has since improved much. In this guide, I will use show what a modern developer should use.
Create the database
Use Xcode to create the model schema. In this guide, the data model name (the .xcdatamodeld file) is “MyDataModel”.
When editing the entity, leave the entity name and class name the same.
Set Codegen to Class Definition.
Throughout this guide, we will use the following Note model as example:
@objc(Note)
public class Note: NSManagedObject { }
extension Note {
    @NSManaged public var content: String?
    @NSManaged public var priority: NSNumber?
}
There is also a generated fetchRequest with the Note type, which I have omitted above, but you should not remove in your code.
Setup the stack
public class DB {

    public static let `default` = DB()

    public var container: NSPersistentContainer!

    /// Call this once in `applicationDidFinishLaunching`
    public func setup(dataModelName: String) {
        container = NSPersistentContainer(name: dataModelName)
        container.loadPersistentStores { _, error in
            if let error = error {
                fatalError("Unable to load persistent stores: \(error)")
            }
        }
    }

}
We create a singleton class DB.default which we will use throughout the app. The setup must be run when the application is launched, with “MyDataModel” name.
It will crash if there is error – and yes, you want it to crash because most apps cannot continue without a working database.
If you have an advanced/unconventional use case, NSPersistentContainer has other inits that will allow you to customize the data model to load, and configure the persistent store.
CRUD
Create (aka save)
The steps in essence:
- Perform everything in a block with background context
- Create a new Note (
NSManagedObjectobject) in the context - Save the context
DB.default.container.performBackgroundTask { context in
    let note = Note(context: context)
    note.content = "Hello World"
    note.priority = 99
    try! context.save()
}
This is the modern way, which is much shorter than the past. If you don’t believe, take a look at Ray Wenderlich’s “updated guide” in 2017, which still uses the tedious way involving NSEntityDescription.entity and NSManagedObject(entity:insertInto:).
What happens when a context is saved? It will commit “one store up”, to either a parent context or the actual persistent store.
Read (aka fetch)
The steps in essence:
- Construct a fetch request (made up of predicates and sort descriptors)
- Use either
viewContext(main thread) ornewBackgroundContext() - Call
fetchwith the fetch request
let fetchRequest: NSFetchRequest<Note> = Note.fetchRequest()
fetchRequest.predicate = ...
fetchRequest.sortDescriptors = ...
let notes = try! DB.default.container.viewContext.fetch(fetchRequest)
notes.forEach {
    print($0.content)
}
Learning predicate will be another topic for another day. If you want to learn, you may refer to the documentation, guide and cheatsheet.
You could also call fetchRequest.execute() directly, which will automatically use the context associated to the current thread. Not recommended unless you are sure of the threads.
Update
Updating is simply mutating the models, then saving the context.
DB.default.container.performBackgroundTask { context in
    let fetchRequest: NSFetchRequest<Note> = Note.fetchRequest()
    fetchRequest.predicate = ...
    let notes = try! context.fetch(fetchRequest)
    let note = notes.first
    note.content = "This is the first note"
    try! context.save()
}
The example above fetch notes in the background context, then mutate the first note and save.
Delete
Once again, use context to delete then save.
DB.default.container.performBackgroundTask { context in
    ...
    context.delete(note)
    try! context.save()
}
Note that if you need to delete all notes, you need to fetch all of them and calling delete for each. This is inefficient since you would need to load all the models, which is unnecessary in a delete. You could set includesPropertyValues to false in the fetch request. Another way is to use batch processing.
Dealing with concurrency
The introduction of NSPersistentContainer simplified Core Data framework, by making developer choose between these two contexts:
viewContextis on main threadnewBackgroundContext()orperformBackgroundTaskis on background thread
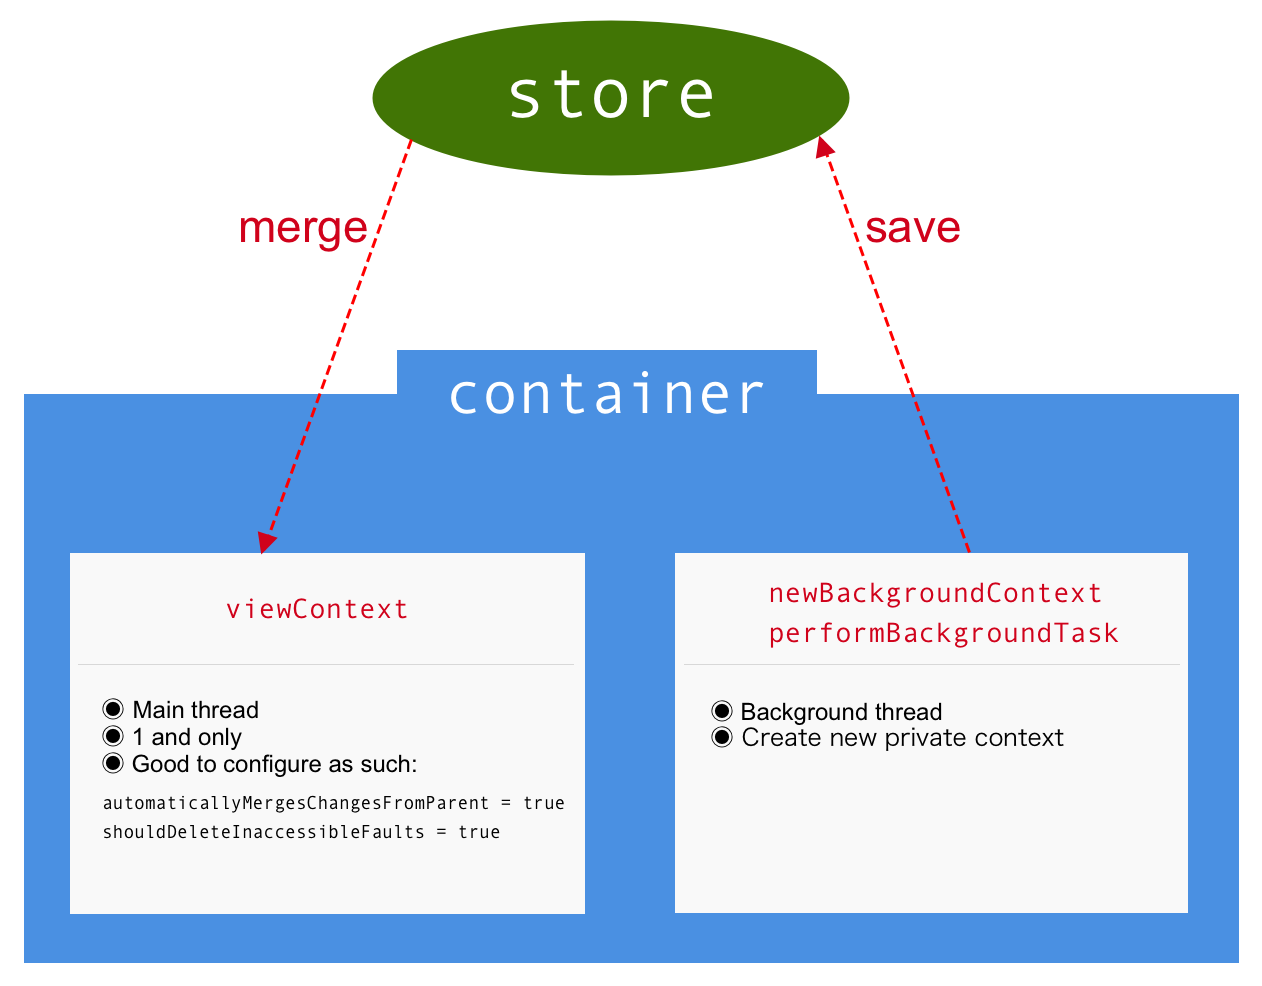
The parent of both viewContext and newBackgroundContext() is the persistent store. As said before, when you save a context, it will commit to the parent.
When you save a background context, it will save to the persistent store, but it will NOT merge to the main context.
Often you would want your main context to reflect changes. To do that, you have to configure viewContext when setting up your database:
container.viewContext.automaticallyMergesChangesFromParent = true
If you perform save concurrently in multiple contexts, you could have merge conflicts. One way is to have an operation queue.
What happens to existing fetched objects when a merge happens? They are not affected. You need to refresh the changes by executing the fetch again.
How to know a context has changes? Observe posted notifications such as NSManagedObjectContextDidSave and deal with the inserted, updated and deleted objects.
What is read-only viewContext?
viewContext is a READ-only property.
You might be misguided to think it means that the context can only read, and cannot write, insert or save. Wrong! The read-only simply means the property cannot be set.
You can run viewContext.save, which will save the context on main thread. If you do so, just ensure that you are not running a very long operation otherwise the main thread will be blocked.
Pitfall: Faults
When you fetch models, sometimes there will be faults.
Faults are “unrealized objects”, designed to make Core Data efficient by avoiding needless fetching, until needed.
Faults are automatically resolved (fetched) when you access the property.
But if the “unrealized object” is somehow deleted, crash could occur. The simple configuration below makes those faults nil instead.
context.shouldDeleteInaccessibleFaults = true
Query Generation
A good time now to get to know this new feature in iOS 10 that prevents faults and crashes. Read this guide and watch WWDC 2016.
In essence, each context is pinned to a snapshot of the database.
By default, context are unpinned. You can start pinning with:
let token = context.queryGenerationToken
context.setQueryGenerationFrom(token)
At some point in time, you could move to the latest snapshot with NSQueryGenerationToken.current.
Prefetching
Prefetching is a concept to load items that is about to be displayed, so that when user scroll, the item is (hopefully) ready. You load anything, asynchronously, such as reading from file, network, or database faults.
This is how you use it together with NSFetchedResultsController, by using asynchronous fetch request to resolve faults.
func tableView(_ tableView: UITableView, prefetchRowsAt indexPaths: [IndexPath]) {
    let fetchRequest: NSFetchRequest<Note> = Note.fetchRequest()
    fetchRequest.returnsObjectsAsFaults = false
    let items = indexPaths.map { fetchedResultsController.object(at: $0) }
    fetchRequest.predicate = NSPredicate(format: "SELF IN %@", items)
    let asyncFetchRequest = NSAsynchronousFetchRequest(fetchRequest: fetchRequest)
    do {
        try fetchedResultsController.managedObjectContext.execute(asyncFetchRequest)
    } catch { }
}
Relationships
Core Data helps to maintain relationships (1-1, 1-many) between entities.
You should always set the inverse, because doing so you only need to set 1 side of the relationship, and Core Data will automatically handle the other side. More importantly, it maintains referential integrity.
Delete rule specify the behaviour when you delete the source entity (eg Department). If you set to “nullify”, the relationship destination (eg Employees) will set all reference to the source null. That is, the affected employees will have no department. If you set to “cascade”, the employees will be deleted.
Other topics
NSFetchedResultsController manages the results from a fetch request, including changes to the objects in the context! In my 2015 guide (in Swift), I provided the boilerplate code for implementing NSFetchedResultsControllerDelegate in a table view.
Migration is unavoidable in app upgrade, but I will leave the topic for another day. It’s a huge topic. You can read this on a progressive way to migrate.
If you use transient property in a model, the code generation will not do anything about it.. For example, if contentCount is a transient value, you should delete the property generated, and write like this:
@objc var contentCount: NSNumber? {
    willAccessValue(forKey: "content")
    let contentCount = content.count
    didAccessValue(forKey: "content")
    return NSNumber(value: contentCount)
}
Core Data is such a complex framework that even the biggest experts argue about “their laws”. Do you use NSManagedObjectContext as a data object? I do sometimes, and sometimes not.
Back to the history..
I use Core Data way back in 2009 when iOS was first launch.
Why use Core Data at all? Because with Core Data API you can avoid writing SQL statements. That is the biggest benefit. A modern way to write database code.
But there are still lots of pain with this piece of Apple technology.
Over 10 years, it did improve, though some updates are long overdue considering it is a vital piece in the iOS/macOS stack.
- 2009: Core Data in iOS 3
- 2010: MagicalRecord is THE wrapper, was in Objective-C, but now dormant.
- 2010: mogenerator is the third party model generator
- 2015: CoreStore is in Swift and still updated, but might not be using the latest concepts
- 2016: Biggest new set of features announced, including
NSPersistContainerand much less verbose API
Back in the days.. my stack is to use MagicalRecord + mogenerator. There are many pitfalls eg. concurrency in managed object context, faults.
But Apple has fixed some quirks, at last.
In WDDC 2016, Apple has a pivotal release with the concept of NSPersistContainer, wrapping the creation of a database stack, and using that same container to access either a main context or a background context.
The managed object class generation is built in, with those sensible methods such as entity(). The use of Swift generic make type casting unnecessary.
Suddenly, Core Data seems much nicer to play with.
Yet there are more that can be improved.