SwiftLint helps to enforce coding style.
It is useful when working in a team because warnings & errors are produced when the code is not up to standard. The rules are fully customizable according to a team needs.
This guide will be on how to setup SwiftLint for an existing project, and with Fastlane.
Step 1. Install the tool
Add to Podfile and do a pod install.
pod 'SwiftLint'
Step 2. Run script on build
In Target > Build Phases > New Run Script Phase, add
"${PODS_ROOT}/SwiftLint/swiftlint"
Now, whenever you build the target, swiftlint will run.
If you run with an existing project, it is likely to have warnings/errors. This is because the default rules are being used.
Step 3. Customize the rules
You can find all the rules in the wiki. By default, around 70% are enabled.
You can customize the rules with a .swiftlint.yml file in the root folder.
Let’s take a look at how the configuration file works:
# You can disable rules that have been enabled by default
disabled_rules:
  - identifier_name
  - force_cast

# Similarly, you can enable rules that have been disabled by default
opt_in_rules:
  - first_where

# Exclude directories that you don't want to lint
excluded:
  - Pods
  - fastlane

# Use "xcode" so that when you build, the result will be shown in Xcode
reporter: "xcode" # Other reporters: json, csv, checkstyle, junit, html, emoji

# The rule `function_body_length` by default triggers warning at 40, error at 100
# This example increases by 3 times
function_body_length:
  warning: 120
  error: 300
Sometimes, you want to dig into the code for each rule to understand how it works.
And you can also create custom rules.
Step 4. Integrate with fastlane
You can already see the warnings whenever you build in Xcode.
Integrating with Fastlane is for another purpose – to generate a HTML report.
# Add a lane in Fastfile
desc "Run lint"
lane :lint do
  swiftlint(
    mode: :lint,
    executable: "Pods/SwiftLint/swiftlint",
    reporter: "html",
    output_file: "swiftlint-results.html",
    ignore_exit_status: true
  )
end
The difference with using fastlane is that the reporter is set to html.
You can run fastlane lint manually, and open up swiftlint-results.html to see all the violations.
Step 5. Autocorrect
Swiftlint has magic.
For some rules, the tool can automatically fix your code! You are lucky if a rule supports autocorrection.
# Add another lane that run autocorrect mode
desc "Run lint autocorrect"
lane :lint_autocorrect do
  swiftlint(
    mode: :autocorrect,
    executable: "Pods/SwiftLint/swiftlint",
    config_file: ".swiftlint-autocorrect.yml"
  )
end
Note that we use a different config file .swiftlint-autocorrect.yml. And in this file, we use another approach to specify the rules – whitelisting.
# Only work with these rules
whitelist_rules:
  - trailing_whitespace
  - trailing_newline
  - vertical_whitespace
Run fastlane lint_autocorrect and watch the magic happens.
Step 6: Disable rules in code
Rules are meant to be broken.
Sometimes, you knowingly break rules.
When that happens, and you really want it that way, you can disable the rule in code on a case-by-case basis.
// swiftlint:disable force_cast
// Now the rule force_cast is disabled
let noWarning = NSNumber() as! Int
// Re-enable back the rules
// swiftlint:enable force_cast

// Disable with `this` (inline), `next` (next line) or `previous`
let noWarning = NSNumber() as! Int // swiftlint:disable:this force_cast
Summary: The approach for an existing project
- Use the default rules
- Build
- Fix a rule by either:
- Autocorrect, if possible
- Remove it by adding to
disabled_rules - Customize it
- Disable in code
When all the default rules are “fixed”, go through the rules that are disabled by default. Add them to opt_in_rules, if useful.
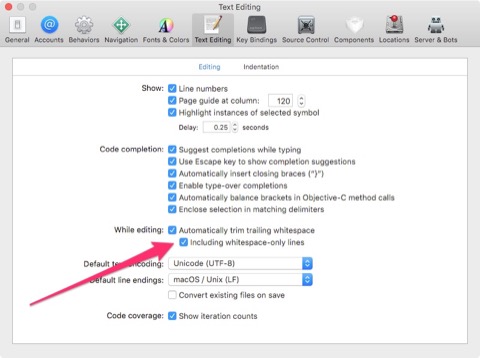
Bonus: Rule trailing_whitespace
“Lines should not have trailing whitespace.”
Xcode by default will have whitespace for empty lines, following the indentation. This is unecessary, a bad default, which you can change.
Enable in Xcode Preferences > Text Editing > Including whitespace-only lines.