UICollectionView is the most powerful view controller in UIKit.
iOS started with the very basic view controller for displaying a list - in the form of UITableView. But a table is simply a top down display of rows.
UICollectionView brings you to the next level and you can layout each of these cells (like rows) anywhere you want.
The Basic
There are 3 types of view in a collection view.
- Collection view cells
- Supplementary views
- Decoration views
You have to be clear between content and layout.
The datasource protocol provides the content to 1) collection view cells and 2) supplementary views. Decoration views are views with no content.
The layout object generates the layout information for all the 3 types of view.
It is this layout object that you can use to create your custom layout.
Before we go on how to customize the layout, let’s dig into supplementary and decoration views, because their roles are often confused.
What are supplementary views?
They are the accompanying views for each section.
Note that I said views, with a plural. You can have multiple supplementary views for each section. In a flow layout, a provided grid layout, you have header and footer – that’s 2 supplementary views.
In your custom layout, you can have as many different supplementary views you want. They are distinguished by kind (a string). The layout object controls how many kind of views there are. Data source populate it after dequeuing.
You must return a resuable view in the data source method collectionView(_:viewForSupplementaryElementOfKind:at:).
If you do now want a supplementary view in a particular case, then your custom layout should not create the attribute for it. Another simpler way is to set the attribute to hide.
And there is decoration view
The 3rd view in a collection view is a decoration view.
This view is purely for decoration, and is managed by the layout object – they do NOT get content from data source.
On the other hand, once again, collection view cells and supplementary views get their content from UICollectionViewDataSource.
Creating a layout
It’s easier to use an example to illustrate.
Disclosure: I read raywenderlich tutorial to come up with this guide. We will create a pinterest layout that looks like this.
The changes that I had was:
- Use Swift 3
- Delegate to provide the cell’s height (instead of separately the heights of photo and annotation)
Similarly, we will keep things simple to have only 2 columns, and no annotation and decoration views.
Layout Delegate
Let’s start with PinterestLayoutDelegate, the delegate protocol that provides PinterestLayout (see later) the height, given the width.
Although the layout role is to set the frames - size and position - it would still need help for attributes that depends on the content. Remember: The layout does NOT know the content.
protocol PinterestLayoutDelegate: class {
    func collectionView(_ collectionView: UICollectionView, heightForCellAt indexPath: IndexPath, withWidth width: CGFloat) -> CGFloat
}
This delegate is like data source protocol, which your view controller must implement to return the height that is needed for the cell. In the case of Pinterest, we want cells height to be accordingly to the image aspect ratio.
Let’s now look at the beef of the subject - PinterestLayout. We are going to break down the class into a few parts.
The Data
class PinterestLayout: UICollectionViewLayout {

    weak var delegate: PinterestLayoutDelegate!

    var numberOfColumns = 2

    private var cache = [UICollectionViewLayoutAttributes]()

    private var contentHeight: CGFloat  = 0.0

    private var contentWidth: CGFloat {
        let insets = collectionView!.contentInset
        return collectionView!.bounds.width - (insets.left + insets.right)
    }
}
The delegate is obvious. In your view controller, you have to assign the delegate, and implement the method to provide the height, as said in the previous section.
We hardcoded the number of columns to 2, for simplicity. But it could change depending on the device width.
cache is a collection of UICollectionViewLayoutAttributes. The cache is to help to optimize the tedious calculation in prepare() (next section).
contentHeight is the total height of the layout that we will calculate, in prepare().
Prepare The Layout
The gist of a custom layout lies in prepare().
Collection view will call prepare() to give the layout object the chance to perform initial computations.
In our case, our goal is to create all the UICollectionViewLayoutAttributes for each cell.
We loop for each item in the collection view, and calculate the (x, y) coordinate to place them. UICollectionViewLayoutAttributes is created with the frame, and added to cache.
You would customize this method for the layout you want.
extension PinterestLayout {
override func prepare() {
// Reset
cache = [UICollectionViewLayoutAttributes]()
contentHeight = 0
let columnWidth = contentWidth / CGFloat(numberOfColumns)
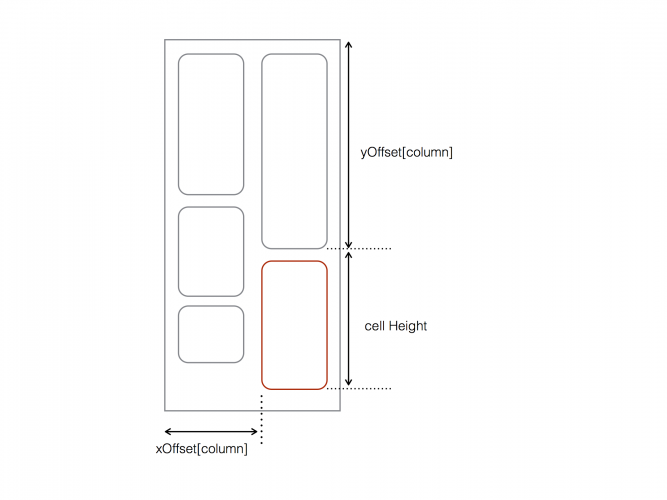
// xOffset tracks for each column. This is fixed, unlike yOffset.
var xOffset = [CGFloat]()
for column in 0 ..< numberOfColumns {
xOffset.append(CGFloat(column) * columnWidth )
}
// yOffset tracks the last y-offset in each column
var yOffset = [CGFloat](repeating: 0, count: numberOfColumns)
// Start calculating for each item
for item in 0 ..< collectionView!.numberOfItems(inSection: 0) {
let indexPath = IndexPath(item: item, section: 0)
let width = columnWidth - cellPadding * 2
let cellHeight = delegate.collectionView(collectionView!, heightForCellAt: indexPath, withWidth: width)
let height = cellHeight + 2*cellPadding
// Find the shortest column to place this item
var shortestColumn = 0
if let minYOffset = yOffset.min() {
shortestColumn = yOffset.index(of: minYOffset) ?? 0
}
let frame = CGRect(x: xOffset[shortestColumn], y: yOffset[shortestColumn], width: columnWidth, height: height)
let insetFrame = frame.insetBy(dx: cellPadding, dy: cellPadding)
// Create our attributes
let attributes = UICollectionViewLayoutAttributes(forCellWith: indexPath)
attributes.frame = insetFrame
cache.append(attributes)
// Updates
contentHeight = max(contentHeight, frame.maxY)
yOffset[shortestColumn] = yOffset[shortestColumn] + height
}
}
}
xOffset and yOffset are arrays to keep track of the last (x, y), for each column.
Other Layout Methods
There are some other methods that the collection view will ask from your layout object. You can return from the cache.
extension PinterestLayout {
    override func layoutAttributesForElements(in rect: CGRect) -> [UICollectionViewLayoutAttributes]? {
        var layoutAttributes = [UICollectionViewLayoutAttributes]()
        for attributes in cache {
            if attributes.frame.intersects(rect) {
                layoutAttributes.append(attributes)
            }
        }
        return layoutAttributes
    }

    override func layoutAttributesForItem(at indexPath: IndexPath) -> UICollectionViewLayoutAttributes? {
        return cache.first { attributes -> Bool in
            return attributes.indexPath == indexPath
        }
    }
}
What about autolayout?
You don’t use autolayout for layout object.
It is “manual layout”, that is to calculate the frames, like good old days.
But you still can use autolayout for WITHIN the cells, supplementary and decoration views.