Overview
iOS Graphics System consists of 3 frameworks:
- UIKit - provide views on a high level
- Core Graphics - lower level drawing support within UIKit views
- Core Animation - ability to apply animation and transformation to UIKit views
Performance of UIImage vs Drawing with code
This answer explained well when is GPU used, and when is CPU used.
Displaying a UIImage is (generally) faster, because after loading the image file (via CPU), the image is loaded onto the GPU. If you now display the image 100 times, it will be very fast, because the GPU already contains the image/texture.
Drawing with code via Core Graphics is slower, because the drawing code happens in the CPU, before being loaded onto the GPU. If you are going to draw 100 times, there will be 100 trips from the CPU to the GPU.
Quoting from Apple Doc:
The use of custom drawing code should be limited to situations where the content you display needs to change dynamically.
If you need to combine standard UI elements with custom drawing, consider using a Core Animation layer to superimpose a custom view with a standard view so that you draw as little as possible.
Animation Effects
Before we jump into the large chunk of this post on drawing images, let’s know how animation effects can be applied to the image.
Core Animation has a layer object, and this is actually a model that encapsulates animations properties - geometry, timing and visual properties.
By modifying this model, you achieve animation easily. The actual rendering is taken care of, and optimized for you.
Drawing/Creating Paths
UIBezierPath is the class to create vector-based shapes.
You create paths with 2 types: straight lines and curves
1. Straight Lines
Assume you have 2 points (CGPoint), you can draw a line with addLineToPoint:
let path = UIBezierPath()
path.moveToPoint(point1)
path.addLineToPoint(point2)
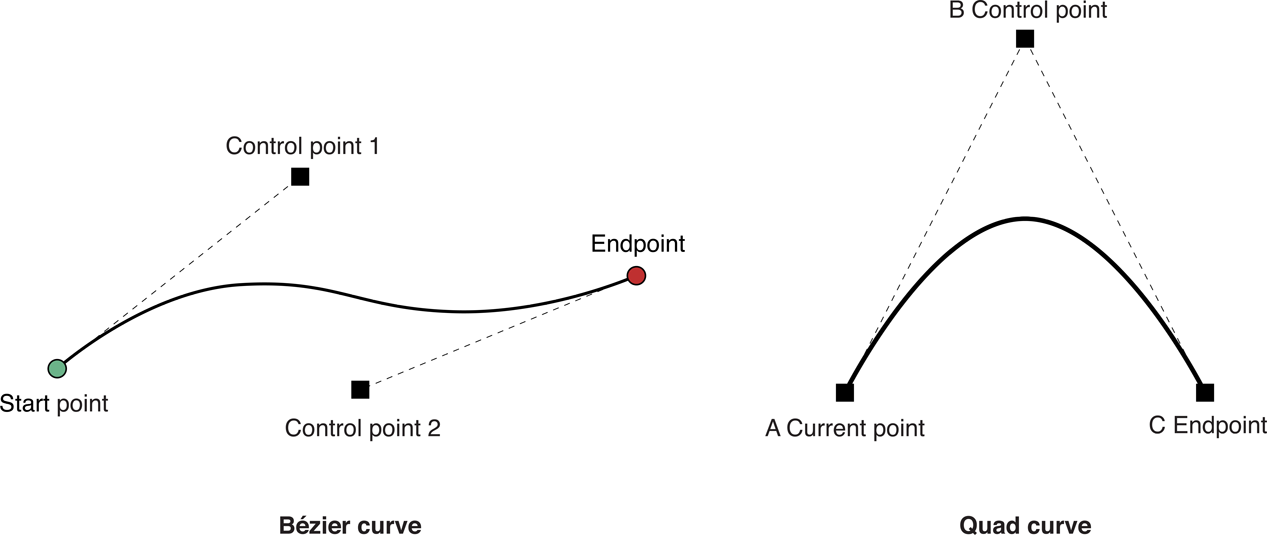
2. Curves
There are 2 types of curves:

- Cubic curve - use
addCurve(to:controlPoint1:controlPoint2:) - Quadratic curve - use
addQuadCurve(to:controlPoint:)
The difference is that a cubic curve has 2 control points.
Bezier curve has complex mathematical relationship, if you are interested.
Underlying CGPathRef
UIBezierPath is really just a wrapper for CGPathRef data type.
You can create CGPaths directly then assign to a UIBezierPath.
Fill & Stroke
With a path constructed, you can then render by filling and stroking with colors.
The code below with fill with red, and stroke a blue line 2 point wide.
UIColor.redColor().setFill()
path.fill()

UIColor.blueColor().setStroke()
path.lineWidth = s2
path.stroke()
There is one thing about filling that you should know. The even-odd fill rule determines if a hole in a path is to be filled or not. By default, usesEvenOddFillRule is false, so usually the hole will be filled.
Drawing an Image
You can also draw an image. Read the section on performance earlier. If you can use UIImageView, then you should.
Otherwize, you can use the draw methods in UIImage:
image.drawAtPoint(point)
CGContext Transformation
You can change the Current Transformation Matix (CTM) for the graphics context.
For example, you can scale the drawing by 50%, then translate (20, 20):
let context = UIGraphicsGetCurrentContext()
CGContextSaveGState(context)

CGContextScaleCTM(context, 0.5, 0.5)
CGContextTranslateCTM(context, 20, 20)

// Draw and render your path etc, with respect to the origin.
// However, the CTM transformation will affect the render.

CGContextRestoreGState(context)
Notice that you should save and restore the graphics states.
Rendering UIImage
These are the steps to generate an UIImage:
let size = CGSize(width: width, height: height)
UIGraphicsBeginImageContextWithOptions(size, false, 0.0)
let context = UIGraphicsGetCurrentContext()

// Create your bezier path, fill, stroke, etc..

let img = UIGraphicsGetImageFromCurrentImageContext()
UIGraphicsEndImageContext()
It is important that you pass 0.0 to UIGraphicsBeginImageContextWithOptions so that the appropriate bitmap size is created for the (eg retina) device automatically.