The secret feature of Xcode
Ok, not exactly a secret, but it is definitely one of the less known features of Xcode, that was never documented.
Whenever you add a new file, you are using one of the provided File Templates. Eg. When you choose a “Cocoa Touch Class” and subsequently selected a UIViewController subclass, it is simply generating the new file with a template.
Knowing how to make full use of it will speed up your development, similar to the tip on Xcode’s code snippets.
If you are using a certain architecture that needs to create many files for a module, file template can help to create and generate boilerplate codes quickly.
Creating Your File Template
You have to store Xcode file templates in
~/Library/Developer/Xcode/Templates/File Templates/
This is stored under your user account. In the later section, we will share a tip using Dropbox to sync all your templates.
For now, let’s create your template under that directory. The /Templates/File Templates/ folders have to be created along with your template eg. MyTemplate.xctemplate (a directory with the extension .xctemplate)
mkdir -p ~/Library/Developer/Xcode/Templates/File\ Templates/MyTemplate.xctemplate/
There is another kind of template known as Project Templates. We will not be discussing it, but you should have guessed where it should be – ~/Library/Developer/Xcode/Templates/Project Templates/.
Now, let’s refer to the provided standard Xcode file templates, which are all in
/Applications/Xcode.app/Contents/Developer/Library/Xcode/Templates/File Templates/
We will copy the simple swift template, and modify for our use later.
cp -R \
/Applications/Xcode.app/Contents/Developer/Library/Xcode/Templates/File\ Templates/Source/Swift\ File.xctemplate/ \
~/Library/Developer/Xcode/Templates/File\ Templates/MyTemplate.xctemplate/
You will see a few files in ~/Library/Developer/Xcode/Templates/File\ Templates/MyTemplate.xctemplate/.
How to use your template
At this point, your custom template can already be used.
In Xcode, add a new file, and search for “MyTemplate” (or scroll to File Templates at the bottom), and it will generate an empty Swift file.
You can also see your template under File Template Library. Or press CMD + ALT + CTRL + 1. You might need to restart Xcode for it to find the newly created template. You can drag a template to your project navigation.
Customize the template
Good, now let’s learn how to customize the template.
There are a few files in a template.
TemplateIcon.png(and the @2x) is obvious – a visual icon to represent your template in XcodeTemplateInfo.plist– like project Info.plist, this property file describes the template
The rest of the files (eg ___FILEBASENAME___.swift) are the actual files that will be created. If you add more files eg. ___FILEBASENAME___+Extension.swift, then that file will be created too.
Let’s dive deeper into TemplateInfo.plist, which provides many options.
There are a few Kind of templates. We usually use Xcode.IDEFoundation.TextSubstitutionFileTemplateKind. Others are Xcode.IDEKit.PlaygroundWithPlatformChoice etc.
The Summary and Description are obvious.
Options
You can provide many Options, an array of dictionary.
Let’s look at this example, with 1 item in the Option array.
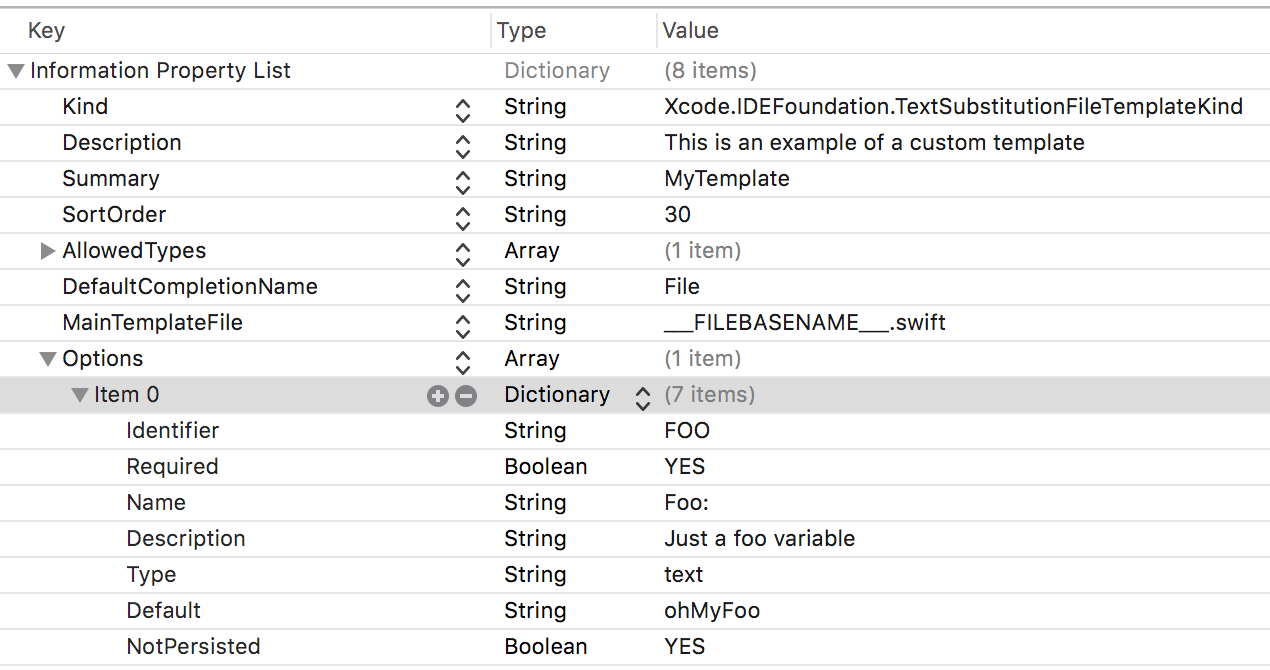
The Identifier is very important. It is the variable name that can be used in the file template.
Eg In ___FILEBASENAME___.swift, you can have this:
let ___VARIABLE_FOO___: String
When you create the file, you will be prompted to enter for “Foo:”, with a default text “ohMyFoo”. The actual generated then becomes
let ohMyFoo: String
You could have other Type, such as popup with it’s Values array.
As you can imagine, you can have multiple variables to be used in the file template.
Special identifier productName
There is a special identifier which you would want to use if you do NOT want Xcode to ask for filename(s), especially if you are creating multiple files.
Add to options a productName identifer, with type text.
Now, if user provide “Awesome” as the productName,
___FILEBASENAME___ViewController.swiftbecomesAwesomeViewController.swift___FILEBASENAME___ViewModel.swiftbecomesAwesomeViewModel.swift- In a file,
___VARIABLE_productName:identifier___ViewModelbecomesAwesomeViewModel(weird macro explained) - In a file,
___FILEBASENAMEASIDENTIFIER___becomes the filename without extension eg.AwesomeViewModel
With that, you can create multiple files easily. Even VIPER becomes less intimidating :p
Sync to Dropbox
If you are using multiple machine, you will like this tip.
We can store our templates in Dropbox, and using symlink to the Xcode folders. This is similar to the tip for syncing code snippets.
Signup for Dropbox if you don’t have an account.
I store them under ~/Dropbox/Workspace/Xcode/Templates. It’s up to you where to store. Move your custom templates to the folder.
For our example, it will be in ~/Dropbox/Workspace/Xcode/Templates/File Templates/MyTemplate.xctemplate/
Then create the symbolic link:
ln -s ~/Dropbox/Workspace/Xcode/Templates ~/Library/Developer/Xcode/
That’s it! Remember to create the symbolic link for every machine.