A previous post on using fastlane’s snapshot for automating screenshots capture provided some good tips.
This post focus on Xcode UI Testing (not snapshot), and is more comprehensive, as it is a complex and not very well documented subject. Plus there are weird buggy behaviours when running UI automation.
Recording Interactions
Xcode can generate code as you interact with your app. Start by creating a UI Testing target.
The record button is disabled at first, because you need to successfully run test once. To do that, go to Product > Test. Also ensure your test cases are listed in your app target scheme under Test.
However, most likely you will not want to use the generated code, as the way they select element is immature, and always producing very long chained statements.
Use Accessibility Identifier
The code generated by Xcode will try to refer to elements using Accessibility Identifier, such as:
app.buttons["back"].tap()
Note that “back” is an identifier, compared to “Back” the name/text in English.
You should NOT be using the accessibility name since that could be localized, so running in different languages would not work as expected. You should always be using accessibility identifier.
Pitfall: Some components such as UIBarButtonItem don’t have the accessibility identifier field under identifier inspector. You could still add it as user defined runtime attributes accessibilityIdentifier with type String.
Tool: Accessibility Inspector
You can open the tool from Xcode > Open Developer Tool > Accessibility Inspector
Run in the simulator, click on the button in top toolbar to start inspection.
Print UI Hierarchy
Before we learnt how to select elements, it is useful to print out the UI hierarchy. You could write print statements with the element debugDescription.
Or you can set breakpoint, then evaluates with po anElement.
An example of a hierarchy:
Other 0x7ff0014a3bc0: traits: 8589934592, {{0.0, 0.0}, {414.0, 736.0}}
   Other 0x7ff00149a490: traits: 8589934592, {{0.0, 0.0}, {414.0, 736.0}}
     NavigationBar 0x7ff00146b8a0: traits: 35192962023424, {{0.0, 20.0}, {414.0, 44.0}}, identifier: 'home'
       Image 0x7ff00174bde0: traits: 8589934596, {{0.0, 0.0}, {414.0, 64.0}}
         Image 0x7ff0014984f0: traits: 8589934596, {{0.0, 64.0}, {414.0, 0.3}}
       Button 0x7ff0014a4240: traits: 8724152321, {{12.0, 31.7}, {21.0, 21.0}}, identifier: 'back'
You can easily see the views hierarchy, type, and identifier. This will come in very handy.
Selecting row in table view
# To select row 0
app.tables.cells.elementBoundByIndex(0).tap()
Selecting Children/Descendants
Using childrenMatchingType, you can get elements that are direct children of an element. In the following, it gets all the children that is of type Image, and at index 2:
anElement.childrenMatchingType(.Image).elementBoundByIndex(2)
Tests if element exists
You can write logical statements and do something, only if certain element exists.
To check if an element exists, simply use the exists property for a XCUIElement.
if app.buttons["back"].exists {
  // Then do something
}
Wait for an element to appear
Sometimes, it takes a while for an element to appear (and be “existed”).
The following waits for 5 sec for the back button to appear.
XCTAssert(app.buttons["back"].waitForExistence(timeout: 5))
Or use a helper.
Force Tap
For strange (aka bugs), certain devices running certain languages might not be able to tap on an element, even if it should be tappable.
Assertion Failure: UI Testing Failure - Unable to find hit point for Button
The solution is to force tap. When an element is un-tappable, get it’s coordinate, and make a tap.
extension XCUIElement {
    func forceTap() {
        if self.hittable {
            self.tap()
        } else {
            let coordinate: XCUICoordinate = self.coordinateWithNormalizedOffset(CGVectorMake(0.0, 0.0))
            coordinate.tap()
        }
    }
}
For example, if the error is thrown when a button is tap(), you can change to forceTap():
app.buttons["back"].forceTap()
XCUICoordinate
We have used XCUICoordinate above. It is slightly more advanced way of dealing element by their coordinates.
XCUIElement.coordinateWithNormalizedOffset creates a new coordinates, by multiplying with the normalized offset. That is, (0, 0) is the element bound origin, while (1,1) is the element bound bottom right. You can even create coordinates beyond the element rect with negative values, or more than 1.
XCUICoordinate.coordinateWithOffset creates a new coordinates, by adding a offset. This time, it is using absolute points.
Sleep
The way to sleep is using sleep(durationInSeconds). That simple.
Testing iPad vs iPhone
Most likely the UI for iPhone and iPad is different. To handle, you should have 2 test cases:
func testSnapshotPhone() {
    guard UIDevice.currentDevice().userInterfaceIdiom == .Phone else { return }
    // Capture screenshots for iPhone
}

func testSnapshotPad() {
    guard UIDevice.currentDevice().userInterfaceIdiom == .Pad else { return }
    // Capture screenshots for iPad
}
Launch Arguments & Environment Variables
You could have an app launch with special behaviours, by passing launch arguments or environnment variables.
These are 2 separate ways, but they are very similar. The key difference is that a launch argument is a string, and environnment variable is a key-value.
But when using launch argument, you can still use it as a key-value eg. -SPECIAL_FEATURE YES.
There are many cool behaviours you can enable, such as -NSDoubleLocalizedStrings YES to make all strings double it’s length, or -AppleLanguages (fr) to run in French.
This is how you launch your app with custom argument in setUp:
override func setUp() {
    super.setUp()
    app = XCUIApplication()
    app.launchArguments += ["-SPECIAL_FEATURE", "YES"]
    app.launch()
}
Then in your app, you can know if there is a launch argument with NSUserDefaults:
NSUserDefaults.standardUserDefaults().boolForKey("SPECIAL_FEATURE")
You may also use NSProcessInfo.processInfo().arguments. Using NSUserDefaults is more convenient since there is boolForKey and etc.
For environment variables, you will use app.launchEnvironment and NSProcessInfo.processInfo().environment correspondingly.
Note that XCUIApplication is not a singleton! So don’t try to have multiple XCUIApplication() in your test case. Have 1 object variable var app: XCUIApplication! in your test case that is used in all methods.
System Alerts
If you have a UIAlertController showing up, or even a system dialog, you can interact with it using addUIInterruptionMonitorWithDescription.
addUIInterruptionMonitor(withDescription: "System permission prompt") { alert -> Bool in
  alert.buttons["Allow"].tap()
  return true
}
The Real Line Number
When using XCTAssert method, it automatically print the line that it fails.
But if you wrap your own function around the XCTAssert, then it will print the line without giving helpful info. Say you have a customAssert that is being called in many places, then you can show the real line and file like this:
    func customAssert(_ element: XCUIElement, file: StaticString = #file, line: UInt = #line) {
      XCTAssert(someExpression, file: file, line: line)
    }
The default #file and #line will refer to the caller.
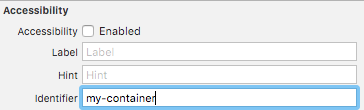
Pitfall: If it is not an interactive element..
If you have elements that are NOT interactable with users, including containers, yet in UI tests you want to refer to it with identifier, read this.
You could set the accessibility identifier for such elements, but you should DISABLE the accessibility element.
Firstly, users will not be able to “access it” (in fact it confuses them if accessible). Secondly, using Accessibility Inspector will be cleaner. And very importantly, XCTest will not be screwed up with selection of element. Heed this advise!